When you are making videos, lighting is essential. It makes your videos look cool and gives them context. Knowing about lighting makes your videos stand out whether you are an experienced video-maker or just starting.
In this guide, we will discuss everything about video lighting. We will focus on different types of lights, some things to consider when setting up the lights, and some cool tricks for videography production to improve the quality of your videos.
Why Good Lighting Matters for Your Videos
Good lighting makes all the difference in your videos. It enhances picture quality, highlights details, and sets the right mood for your audience in video platforms. Hence, this explains why having good lighting is crucial:
Purpose of Optimal Lighting Setup
Equal distribution of light across the scenes: It will be light and clear if every part of your video gets equal amounts of light. As a result, equilibrium is created by balancing everything in each frame.
Minimizing Shadows and Hotspots
Shadows appear when there is too much or too little light, while hotspots are bright spots due to excessive illumination. These elements distract from what the video is saying. This problem may, however, be removed by adjusting how your lights are set up.
Consistent Color Temperature Throughout the Shoot
Different light sources have distinct color temperatures. There could be daylight with one temperature, whereas indoor bulbs may have another. Consequently, maintaining consistent color temperatures avoids shifts within colors used in a video.
Creating Desired Atmosphere Within Frame
Lighting can elicit emotions and create specific ambiances. Darker lighting might imply romance or mystery, while brighter ones indicate energy or excitement.
Following these four aspects helps you create captivating films that touch hearts long after they’ve watched them. Keep practicing till perfection is achieved because different projects may require varied lighting scenarios.
Types of Lighting Explained
1. Natural Lighting
Benefits
- Free Source of Light: You don't have to pay for natural light, making it cost-effective.
- Provides Soft, Diffused Light: This light gives your video a gentle and flattering glow.
- Creates Natural Ambiance: It helps achieve realism in scenes, improving their overall look.
Challenges
- Limited Control Over Intensity and Direction: The brightness or angle of the sun cannot be adjusted easily.
- Varying Color Temperatures Depending on the Time of Day and Weather Conditions. The look of your videos will change as sunlight changes color during the day.
- Unpredictability Due to Environmental Factors. Clouds, rain, or even shadows can affect lighting unexpectedly.
2. Artificial Lighting
There are different types:
a. LED Lights
- Energy Efficient: They use less power and are eco-friendly alternatives for illumination purposes.
- Long Lifespan: These last for a long time. You don’t need to buy new ones frequently.
- Adjustable Color Temperature: The light’s warmth or coolness can change according to how you want it.
- Compact Size: They are small and, therefore, easy to carry around since they are always portable.
b. Fluorescent Lights
- Low Heat Emission – They stay cold throughout the use period, thus being safer compared with other types of lights used in photography studios.
- Wide Range Of Colors – Various hues are available, ensuring that fluorescent bulbs have many options that suit diverse needs.
- Relatively Low Cost – These are cheap compared to those expensive alternatives commonly found elsewhere today.
c. Tungsten Lights
- High Output: They give you a solid and bright light for your videos to be made.
- The Traditional Choice for Filmmaking: Tungsten lights have been used in movies for a long time.
- Gelling is needed when working alongside daylight sources. Tungsten lights need to be matched with natural light using filters.
d. Strobe Lighting
- Freezes Motion: This feature can capture fast movements without blur.
- Allows Use of Lower ISO Settings: You can help eliminate noise from your shots by using this setting.
- Produces Crisp, Sharp Images: This light gives your subjects a clear and defined look.
Points to consider when choosing Artificial lighting for recording videos
Synchronization Issues with Cameras: Flashing a camera at the right moment may prove difficult
Potential Flickering Effects if Not Properly Synced: Improper syncing can cause unwanted flickers in your videos.
May Require Additional Equipment Like Flash Triggers: Some cases may require more accessories like flash triggers to nail specific strobe lighting effects.
Understanding these lighting options will help you choose the best setup for your video projects, ensuring you achieve your content's desired look and feel.
Factors to Think About for Video Lighting
Color Temperature
What is Color Temperature?
It shows if a light is warm (yellowish) or cool (bluish).
How is it Measured?
It's measured in Kelvin units.
Colors’ Impact
The color temperature influences the look of your video’s colors.
Here is why considering color temperature is vital for your video lighting:
Warmth vs Coolness
The warmer ones give off yellowish hues, while the cooler ones produce bluer tints. They know which kind of light will work best for your project, thus aiding you to get the expected results.
Matching Color Temperatures
If two different color temperatures are mixed, the resulting colors will not look natural during their filming. Ensure you preserve a consistent color temperature throughout the shoot for a cohesive look.
Skin Tone Accuracy
Human skin comes in shades, but most have warm or cool tones. The right color temperature will help you get the proper skin tones without unpleasant surprises during editing.
White Balance
Modern digital cameras allow users to set the white balance manually based on the primary light source’s color temperature. Nevertheless, remember that mixed ambient doesn’t always work with auto-white balance.
Colour Correction
While it is best to maintain consistent colors throughout your shoot, especially about color temperatures, sometimes there may be slight discrepancies. Knowing how to perform color correction on post-processing software will help correct this and give you a polished final product.
Color Temperature Charts
Several online resources and apps offer color temperature charts for various light sources. Use such tools to choose the appropriate color temperature for your project.
Application
Try applying what you learn about the color temperature in real-life situations as you gain experience.
For instance, imagine shooting an indoor wedding video with incandescent and fluorescent lights.
By selecting the right color temperature for each lighting fixture, they can be blended artistically, making your video coherent and more appealing.
Considering these aspects and their practical implications will improve the quality of the set-up and lighting in your videos, making them visually engaging and relevant to your viewers.
Light Intensity
Amount of Light: Quantity of light from a source
Exposure Levels: The direct effect on video brightness or darkness
Brightness and Contrast: This makes your images look more vivid or dull.
Camera Sensitivity: Needs to be taken into account when balancing light intensity
Here is why considering Light Intensity is vital for your video lighting:
Controlling Exposure
To help manage exposure levels in your videos, you can adjust light intensity so you do not have overexposed or underexposed footage.
Balancing Brightness and Contrast
You can balance bright and dark areas in your videos by carefully controlling light intensities, making them better to look at overall.
Working With Different Cameras
Every camera model has different sensitivities to light. Knowing this will enable you to choose the right amount of light for your project.
Understanding Stop Values
Each increase or decrease in f-stop numbers corresponds to halving or doubling the light entering the camera sensor. Acquainting yourself with these values allows you to fine-tune your lighting setup efficiently.
Using Light Meter Apps
Mobile phones and light meter apps help measure the light level and ensure proper exposure before shooting commences.
Practicing Manual Mode
Learning to use manual mode on one’s camera shot puts the photographer in charge of getting exact amounts of intensity and exposed video images, which are thus more flexible for lighting needs.
Combining Multiple Light Sources
A combination of multiple lights with varied intensities can assist one in creating complex lighting arrangements that tell stories through it.
Visualizing Light Patterns
Thinking about how a scene’s objects and surfaces respond to its illumination helps anticipate any challenges during shooting while also planning ways around them.
Experimenting With Light Ratios
Playing around with different ratios regarding key, fill, and backlight intensities provides various exciting video lighting styles.
By incorporating these additional points into your understanding of light intensity, you'll be equipped to handle various lighting scenarios confidently and creatively.
Light Direction
Light direction can be defined as:
Light Placement: Positioning lights about your subjects and background
Shadow Patterns and Highlights: Directly influenced by the light direction
Three-Dimensionality: Impacts the depth and texture of your videos
Reflections and Glare: These need to be avoided by careful consideration of the light direction
Here is why considering Light Direction is vital for your video lighting:
Understanding Shadows
Although shadows can provide depth to a video, they can also distract from the content. For instance, good lighting can enable you to manage shadowing in your shots.
Highlighting Key Features
Directing light toward specific scene areas can help you highlight essential elements and create visual interest.
Creating Depth
Using light direction that creates shadows plus highlights brings depth and texture into a video, making it more attractive for viewers.
Avoiding Reflections and Glare
Concerning light direction, one may avoid reflections or glare by not having extraneous shiny surfaces in the frame or behind the camera, which could diminish the footage's overall quality.
Using Natural Light
In case natural light is being used, its position, depending on where the sun is shining, affects the positioning of subjects with the camera, enabling the desired effects for lighting to be achieved.
Light Quality (Color Rendition Index - CRI)
It Measures how accurately a light source reproduces colors compared to a reference source.
Higher CRI Values: Result in better color representation in your videos
Here is why considering Light Quality is vital for your video lighting:
Choosing the Appropriate Light Source
CRI values differ among different light sources. Employing the right light source for your task will enhance color accuracy as intended.
Using CRI as a Guide
While it is crucial, it isn’t the only thing to consider. Therefore, besides CRI, other factors such as light intensity and color temperature will impact accurate color representation.
Light Modifiers
These are add-ons that change the characteristics of artificial sources of light.
Some examples are diffusion materials, reflectors, and barn doors.
Its purpose is to Shape, direct, and control light to achieve the intended effects.
Factors to consider when using Light Modifiers
Materials for Diffusion: Reduce hard light while minimizing shadows to ensure a better-looking appearance.
Reflectors: Reflect light onto subjects, leading to fill-lighting and shadow reduction.
Barn Doors: Control the direction of the light, thereby eliminating unwanted spillage and glare.
Gels – This introduces colors into lights, resulting in unique and creative lighting configurations.
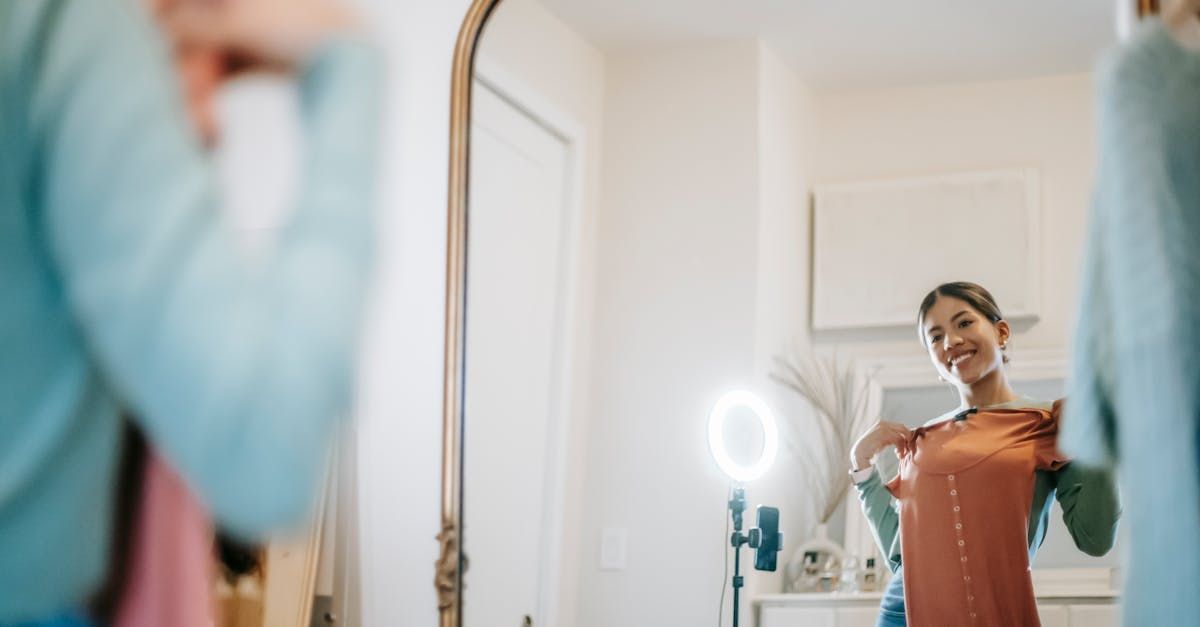
Umbrellas & Soft Boxes- perfect diffused illumination for portrait & product photography is usually achieved through softboxes or umbrellas to create a smooth, even glow across the subject area.
Setting Up Your Video Lighting for the the Best Lighting for Recording Videos
Three-Point Lighting Setup:
1. Key Light
Primary Source Of Illumination: It gives your subject the most brightness.
Position: Place it at a 45-degree angle relative to the subject to create depth and dimension.
Defines The Form And Texture: It adds visual interest by highlighting the shape and texture of your subject.
2. Fill Light
Shadow Softener: It helps to reduce harsh shadows cast by the key light.
Placement: This is positioned on the opposite side of the leading light to balance illumination intensity.
Enhances Details: Fills in shadows to reveal more details and create a more flattering look.
3. Backlight
Separation and Depth: It puts a light halo around your subject so they do not seem part of the background.
Positioning: Put it behind your subject to create a gentle rim of light on their edges.
Prevents Silhouettes: Your subjects will no longer appear as dark silhouettes against bright backgrounds.
Additional Lighting Techniques to use for the Best Lighting for Recording Videos
Rim Light
Side Lighting: Brightens up the edges of an object, subtly outlining it.
Adding Volume and Curves: Making a subject look more three-dimensional, adding depth to it.
Separation Technique: Serves to separate the main character from the background and emphasizes it.
Background Light
Enhancement of Background: Brings light in the background without overshadowing what is essential in a picture or on screen.
Depth plus Interest: It deepens imagery and introduces another point of interest in compositions.
Addition of Detail: Sometimes called gobo (Go-Between), which adds texture to your environment without distracting too much from your characters.
Other lighting you can employ to get the Best Lighting for Recording Videos
Hair lights- Hair lights are used above or behind a subject to highlight and separate them from the background and add beauty.
Accent Lights- Smaller bulbs can be used in a scene to add excitement while directing attention towards where you want it at any given time.
Practical Lights- Think of desk lamps, reading lights, or any other ordinary household lamps that can help set a mood in your room or fill in some shady spots for a more natural effect.
Find appropriate lighting setups that suit your video project and enhance its aesthetics through these additional points.
By incorporating such elements into your lighting system, videos will be visually appealing with depth, dimensionality, and professional polish that will keep people watching them until they finish, so please pay attention while shooting this stuff.
Getting the Most Out of Your Video Lighting to get the Best Lighting for Recording Videos
Avoid Dramatic Shadows
This involves using a second source of artificial illumination to counteract shadowing caused by essential lighting techniques employed during filmmaking.
For example, taking high-essential portrait photos when one light is positioned perpendicularly to the camera lens placement and another lamp offset at a 45-degree angle behind or above the model head to create enough separation.
Moving Key Light Closer To Subject- place your crucial light closer to the subject so that shadows are not cast far.
Increasing Space between Key and Fill Lights- Move the fill light away from the subject to get a softer gradient effect from lit areas into shadow areas.
Balancing Light And Dark to Get the Best Lighting for Recording Videos
Adjusting Intensities of Key and Fill Lights- By varying the intensities of these two lights, one can balance brights and darks.
Backlight placement – Always ensure that your backlights are well placed so they don’t wash out the background and create some distance between your subject and its surrounding environment.
Led Lighting Diffusers For Proper Shaping Of Light Output- These could be used in modifying the lamp’s quality by holding them in front of it where one may thus apply diffusion like gels on surfaces, reflectors, or barn doors, for instance, while shaping up luminaire rays according to personal preferences.
Using Softboxes Instead of Umbrellas
Soft Box Distributes Light More Evenly: Softening is a light-reducing process that tones down the brightness emitted, resulting in soothing lighting irradiating all over surroundings rather than one point source.
Hence, this tool will produce ambient illumination needed during portrait sessions when you want an even spread glow across the entire frame without any harsh shadows present anywhere within the image area;
Reflectors Are Used As Fillers- A good example can be seen when sunlight is reflected off of sand onto beach goer’s bodies, giving them beautiful tans but also preventing too many highlights from being formed on the skin surface at once, therefore cooling down slightly with the help fans underneath;
Defuse & Reflect – Add This Way Lessens Overexposure: Use diffusers or reflectors instead, reducing specular highlights so the picture looks more natural.
You can use these video production tips and always try to learn from lighting that will enable you to make amazing videos that capture your viewers' attention while exhibiting your talent.
Avoid These Video Lighting Mistakes when looking for the best lighting for recording videos.
Overexposure or Underexposure
This causes details to be lost in the highlights or shadows.
Clipping and Loss of Dynamic Range: A clipping is a loss of dynamic range that limits tonal range in photographs.
Inconsistent Color Temperature
Unnatural-Looking Images: Results in unnatural images.
Post-Production Challenges: One cannot match shots during post-production.
Ignoring Background Lighting
Flat and Uninteresting Composition: The back looks dull and uninteresting.
Insufficient Depth: It needs to give more depth to the composition.
Monitor histograms to check exposure levels regularly & prevent over-exposing or under-exposing.
Calibrate frequent surveys to ensure accurate color representation.- (11 words)
Having good lighting setup plans helps in making a lighting diagram.
Before production begins, it is crucial to test your lighting setup as many times as possible so that early mistakes can be identified and corrected.
Budget-Friendly Lighting Options for the Best Lighting for Recording Videos
DIY Solutions
Home-made Diffusers: Use a white cloth or foam board to soften the light without creating shadows.
Repurposing Household Items: Cardboard boxes or aluminum foil can be used instead of light modifiers by attaching them correctly inside the box.- 28 words
Simple Light Stands: Make these light stands with PVC pipes or other cheap materials, building them from scratch yourself.-20 words
Affordable Professional Lighting Kits For the Best Lighting for Recording Videos
Entry-Level LED Panels – They offer energy efficiency and versatile mounting options. Many options include basic photographic lighting kits and continuous lighting setups.-20 words
Basic Fluorescent Kits offer a cheaper alternative to moderately priced continuous light sources.
Portable Speedlights with Umbrella or Softbox Attachments allow mobility and flexibility when setting portable lights.
Avoid common mistakes and use low-cost lighting options during video production. In that case, creating beautiful works that excite your viewers within your limited financial means is possible.
Final Words on the Best Lighting for Recording Videos:
It is a good idea to work on becoming perfect in video lighting, as this is the only way to produce high-quality videos. To make your content visually appealing, you must remember several things, such as preventing overexposing, keeping the temperature of colors consistent all over, and background illumination.
Experiment with diverse kinds of light setups while using cost-effective methods like DIY solutions and cheap professional kits; keep learning and improving your knowledge about photography lights. If you need assistance from an expert who understands what makes up perfect video creation techniques, including obtaining the best-ever lighting, contact us via our official lines.

Get total clarity on your video marketing and paid media with our FREE comprehensive data audit.
CINESALON NEWS